- Overview
- General/wet preparation equipment
- Microscopy
- Spectroscopy
- Chromatography (separation)
- Chromatography (detection)
- Molecular Biology
- Cell culture
- Electrophysiology
- 3D Bioprinting
- Various methods
To understand how life works, one has to study all it's aspects and one of the crucial approaches in this regard is what we call molecular Biology. Its focus lies on the investigation of biological molecules, especially genes and proteins and the correlation between their structure, functions and interactions.
Various methods are used in this field, however, there are a few standard techniques that are probably used in every molecular biology lab, such as immunostaining, gel electrophoresis with blotting, cloning, etc. Here we will discuss some of the basic tools for the mentioned techniques and the existing DIY counterparts. Many of the techniques, can also be used in combination with other tools and methods, which extends the insight a scientist gets even further. A good example for this is immunostaining (e.g. immunoessays, immunohistochemistry), as it can be used in imaging of microarrays, chromatography, microscopy...

Source: http://www.epitomics.com/products/product_info/1257
Analyzing the presence or concentration of proteins, or other macromolecules in a sample by proteins is generally termed an immunoessay. Usually the proteins are antibodies (immunoglobulins, short Ig or AB) which are large Y shaped structures, that bind to so called antigens (read more on the antobody - antigen interaction here). Other (and from procedure very similar) interactions are, however, also possible, e.g. lectins - carbohydrate linking, etc. The antibodies are typically linked to other molecules, such as enzymes, fluorescent markers, radioactive isotopes, etc., which can then produce observable changes in a sample if present.
With the technological developments in this area, the analytical methos are becoming smaller, more compact and allow the simultaneous measurement of several samples at once. A golden standard for immunoessays has become the analysis of 96 well microtiter plates with so-called plate readers. One of the more popular methods is the so called enzyme-linked immunosorbent assay, or ELISA. Here, the to be analyzed samples (hopefully containing appropriate antigens) are bound to the well substrate, to which enzyme-functionalized antibodies are applied and the wells are rinsed at the end, to wash away the nonspecifically bound antibodies before the analysis.
Keywords: immunoessay, antibody, plate, reader, elisa
New plate readers cost around 10k€, while used ones can be obtained for somewaht less.
DIY plate readers exist in varying forms of sophistication, ranging from a reused CD drive lab scanner, and a 96 LED array available as a kit, up to a fully documented almost lab-standard arduino based plate reader, or a portable lab-on-a-chip system.
It is difficult to comment on the performance of the current devices, as there aren't many testing data available. An exception is the portable lab-on-a-chip system, which is capable of detecting samples amount in the nanogram range. Despite lacking data, the listed devices seem very promising and deserve proper testing.
One of the benefits of the readers, adapted for 96 well microtiter plates, is the large amount of samples, which can be tested simultaneously, but also the standardized equipment that comes along and facilitates efficient handling. It therefore makes sense, to create something compatible with the current standards. The detection capabilities are in principle the same, as for UV-vis and fluorescent spectroscopy.
Source: By Amanthabagdon - Own work, Public Domain, https://commons.wikimedia.org/w/index.php?curid=5055925
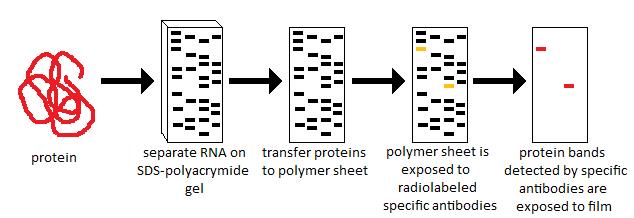
Blotting is the process of transferring biomolecules to a carier membrane, such as nitrocellulose, nylon, PVDF, etc. This is usually performed after chromatographic procedures such as gel electrophoresis, but can also be done by directly applying samples under pressure (dot-blot). We will be discussing the first one in more detail. Blotting from electrophoresis gels is performed, by a secondary electrophoretic step (electroblotting), this time in a direction perpendicular to the gels flat side, which moves the analytes out of the gel and onto a membrane. Depending on the to be transferred solutes, different methods are used, such as Northern blotting (RNA), Southern blotting (DNA), Western blotting (proteins), Eastern blotting (post-translational modifications),... Based on the procedure, however, there are two types of electroblotting, that are widely used:
- the wet blotting procedure, where the transfer material (gel, membrane, filter) swims in the transfer solution and
- the semi-dry procedure, where the transfer material is only soaked in buffer beforehand
Which one to use, seems to be a thing of personal preference, more than a performance issue, since both methods get the job done. For our purposes, the question is also, which one is easier and more efficient to assemble.
Keywords: blotting, western, southern, electroblotting, membrane, semi-dry, tank, wet
Blotters cost a few hundred € to a little over a 1000€, used devices are available for around 300€, depending on the device conditions. A semi-dry or wet blotter is, however, not sufficient to run a sample transfer by itself. Just as the electrophoresis chamber, it also requires a power supply, as discussed in the chromatography chapter.
There really aren't any well documented DIY blotters on the internet, despite the basic construction is nothing else than a large capacitor, that is connected to a power supply. As discussed in previous chapters, the DIY molecular bioresearch community seems to focus more on DNA analysis, compared to that of proteins. Interesting development does, however, seem to be appearing in the development of novel protein analysis systems on a research level, as described here.
/
A good electroblotter only has to fulfill a few basic requirements. It has to sustain an even current through wet transfer material (filter paper, chromatography gel, transfer membrane), for a predestined amount of time.
###Darkroom and photo-processing

Source: By Inkaroad - Own work, CC BY-SA 3.0, https://commons.wikimedia.org/w/index.php?curid=16991285
Antibodies, functionalized for immunohistochemistry typically have traits, which allow some form of luminescence. In westernblotts, often peroxidases (e.g. horseradish peroxidase) are linked to the secondary antibody. When the blott is then soaked in a peroxide/luminol solution, the HRP (which uses peroxide as the oxidazing agent) oxidizes the luminol, that thereby emits light. Thus, proteins contained in the blott can be made visible and their projection captured on photographic film. This requires a darkroom (where the photosensitive film is fully protected from ambient light) with long-wavelength red light, that doesn't excite the photographic foils, yet is visible to the eye and typical photo-development solutions: developer, fixative, water for rinsing.
Keywords: photo, development, darkroom, luminol, immunohistochemisty
Darkrooms aren't usually "bought", but installed, which depends on the available facilities in the lab and is always at least in part DIY.
With the development of digital photography, the photofilm and laboratory darkrooms, despite being romantic, could possibly be replaced. In DNA gels, this is already being performed, and may be possible (depending on camera sensitivity) for western blotts as well. One such example is the imaging enclosure from IOrodeo.
Immunohistochemical imaging would require a completely dark chamber and some form of imaging, which is sensitive enough to record the weak luminescence singals, emitted by the sample.

Source: By Enzoklop - Own work, CC BY-SA 3.0, https://commons.wikimedia.org/w/index.php?curid=32003643
Thermocyclers are devices used to multiply DNA fragments, by the enzymatic activity of the "Taq (isolated from the thermophilic bacterium Thermus aquaticus) polymerase" in the so called polymerase chain reaction or PCR for short. For the reaction to take place successfully, several different steps (DNA melting, primer linking, enzyme dependent elongation) need to occur, which happens at very specific temperatures. For a maximum yield it is therefore important that the temperature and time of each step be as precise as possible. This is what thermocyclers are used for - to rapidly change and hold the temperature of the reaction for a predetermined amount of time.
More about DNA analysis and the PCR can be read here and here.
Keywords: thermocycler, DNA, polymerase, chain, reaction, PCR
Many commercial devices are available for a few thousand euros, but can also reach amounts above €10k. 2nd hand units can be found online for €200-€300, models from over 10 years ago are generally just as capable as modern day units (provided they are modern enough to be based on a solid heating and cooling block design).
Just recently, however, a new kickstarter project went online, called Bento lab. It offers a portable DNA analysis set, including a thermocycler, pipette, centrifuge, gel electrophoresis and translumination unit for £699 (kickstarter price). While there are no DIY instructions available (yet), it could prove difficult to make a set of DIY tools that offer the functionality but are still cheaper. But time will tell.
As genetics is one of the more popular field among DIY Biologists, thermocyclers are available in many forms, ranging from a recycled electronic coffe cup, to maybe the commonly best known OpenPCR, which has also had its redesigns, such as NinjaPCR and Wild OpenPCR. Possibly the cheapest version up to date is the Arduino PCR.
A very cheap but extremely annoying to use method, perhaps suitable for a one-off PCR reaction, is to manually move the PCR reaction tube between 3 water baths set to 95°C, 60°C, and 72°C.
Most critical in a PCR is the precise and accurate temperature and time control. This requires adequate means of heating and cooling (usually by peltier elements), fast and even heat transfer to/from the sample (metal blocks) and temperature sensing/regulation. How the DIY devices perform is hard to say without measurement data, however, considering the cheap and available materials, which are at disposal, it is possible, little can be done to improve the price/quality ratio.
The best option for many DIY labs will be to look for 2nd hand PCR machines in order to obtain a precise and reliable unit at a low price.
As discussed above, a PCR requires precise and accurate heating and cooling for exact amounts of time with fast transitions between the different phases. One should not forget, however, that a PCR also requires adequate enzymes and primers for the reaction to yield any results.

Gene gun by Rüdiger Trojok, Source: http://biohacker1991.tumblr.com/post/97628655585/new-politic-hacking-the-gene-gun-technology
While genes are always transferred from parent to offspring during reproduction (vertical gene transfer), the ultimate goal of biotechnology is so called horizontal transfer (from one species to another). This can often be achieved and requires the isolation of genes from one specimen, purifying them and then inserting them into target cells. There are different ways to achieve this, one of them is using a so called gene gun. Originally developed for the modification of plant cells (which prove especially difficult to transform), it can be used for any type of cells. Particles with attached plasmids (DNA units, containing genes) are fired towards target cells, that are penetrated and hopefully integrate the foreign DNA.
Keywords: horizontal, transfer, gene, gun
Commercial gene guns typically cost a few thousand €, used ones are available for a few hundred €.
The first DIY gene gun was developed by Rüdiger Trojok based on a cream dispenser. Later had its rip-off versions, such as this one which can be built for roughly 70$.
Apparently, the DIY gene gun design is capable of transfering genes sucessfully with adequatly prepared gold or wolfram nanoparticles.
For a DIY gene gun to be effective, appropriate plasmids and carrier particles need to be prepared beforehand. The gun itself is in principle an air pressure pistol and requires an effective targeting and firing mechanism, ideally also pressure control.