This is the 5th Envoy & Open Policy Agent Getting Started Guides. Each guide is intended to explore a single feature and walk through a simple implementation. Each guide builds on the concepts explored in the previous guide with the end goal of building a very powerful authorization service by the end of the series.
Here is a list of the Getting Started Guides that are currently available.
- Using Envoy as a Front Proxy --- Learn how to set up Envoy as a front proxy with docker
- Adding Observability Tools --- Learn how to add ElasticSearch and Kibana to your Envoy front proxy environment
- Plugging Open Policy Agent into Envoy --- Learn how to use Open Policy Agent with Envoy for more powerful authorization rules
- Using the Open Policy Agent CLI --- Learn how to use Open Policy Agent Command Line Interface
- JWS Signature Validation with OPA --- Learn how to validate JWS signatures with Open Policy Agent
- JWS Signature Validation with Envoy --- Learn how to validate JWS signatures natively with Envoy
- Putting It All Together with Composite Authorization --- Learn how to Implement Application Specific Authorization Rules
- Configuring Envoy Logs Taps and Traces --- Learn how to configure Envoy's access logs taps for capturing full requests & responses and traces
- Sign / Verify HTTP Requests --- Learn how to use Envoy & OPA to sign and validate HTTP Requests
This getting started guide will validate 3 different identity tokens that are expressed as Signed JSON web tokens (JWS) for short. This guide assumes knowledge of several IETF RFCs:
- The format for a JWS and standard claims included in it is specified by the IETF in RFC 7515
- The signing algorithms for JSON Web tokens is specified by the IETF in RFC 7518
- Encryption keys used for signing and validation are specified by the IETF in RFC 7517
There is another tool that was used to create this getting started guide, jose-util:
- JSON Web Token Signing and Encryption is commonly abbreviated as JOSE
- A command line utility called jose-util is available as part of a Golang JOSE library from Square
- To install it execute:
-
go get -u github.com/square/go-jose/jose-util -
go install github.com/square/go-jose/jose-util - and make sure your go install directory is in your path
-
Use of this tool is optional since the tool has alredy been used and the results are already stored in the project.
The scenario being simulated is a customer calling into a company to inquire about an order that they have placed. Various JWS tokens are used as a tamper resistent mechanism to communicate information about these participants through the API request chain.
The keys sub directory contains encryption keys that have been pre-created for you. If you would like to create new keys and have jose-util installed then run the script ./generate_keys.sh
The identities sub directory contains simulated identity tokens as JSON files. The script
./create_jws_tokens.shA customer has called in to a company to enquire about an order that they have placed. The customer was authenticated by going through the Voice Response Unit (VRU) and evidence of that authentication is captured as a JWS token and is placed in the subject-token header. The customer identity provider performed the authentication. This token saves repeated database lookups and is used to authorize what the customer can do and has access to.
- The
issfield contains the customer identity provider as the issuer. - The
profileRefIDis a customer claim that can be used to get the customer's preferences. - The
customerRefIDis a custom claim that can be used to get details about the customer. - The
consentIDis a custom claim that can be used to get details about what the customer has consented to and opted out from. - The remaining claims are standard claims that contain information about the token issuance, use and authentication methods performed.
The full token is below:
{
    "iss": "customerIdentity.example.com",
    "sub": "customerIdentity:DBm4FBclSD261G2",
    "profileRefID": "34983598sfkh9w8798798d",
    "customerRefID": "DBm4FBclSD261G2",
    "consentID": "4378afd4f",
    "aud": [ "apigateway.example.com", "protected-stuff.example.com"],
    "azp": "app_123456",
    "exp": 2735689600,
    "iat": 1597676718,
    "auth_time": 1597676718,
    "jti": "o8T2hxraeFzIQ6p",
    "nonce": "n-0S6_WzA2Mj",
    "acr": "urn:mace:incommon:iap:silver",
    "amr": [
      "face",
      "fpt",
      "geo",
      "mfa"
    ],
    "vot": "P1.Cc.Ac",
    "vtm": "https://example.org/vot-trust-framework"
}The call center agent was authenticated by the application she / he is using. Evidence of that authentication is captured as a JWS token is placed in the actor-token header. The workforce identity provider performed the authentication. This token saves repeated database lookups and is used to authorize what an agent can do on their own behalf as well as what an agent can do on the customer's behalf.
- The
issfield contains the workforce identity provider as the issuer. - The remaining claims are standard claims that contain information about the token issuance, and use.
The full token is below:
{
    "iss": "workforceIdentity.example.com",
    "sub": "workforceIdentity:406319",
    "aud": [ "apigateway.example.com", "protected-stuff.example.com"],
    "azp": "app_123456",
    "exp": 2735689600,
    "iat": 1597676718,
    "auth_time": 1597676718,
    "jti": "mPPdwJ7Jrr2MQzS"
}The application that the call center agent is using was authenticated by the API gateway. Proof of authentication and application details are placed in the app-token header. This stateless token saves repeated database lookups and is used for application level authorizations.
- The
issfield contains the API gateway as the issuer. - The client_id The remaining claims are standard claims that contain information about the token issuance, and use.
The full token is below:
{
    "iss": "apigateway.example.com",
    "sub": "apigateway:app_123456",
    "aud": [ "apigateway.example.com", "protected-stuff.example.com"],
    "azp": "app_123456",
    "client_id": "app_123456",
    "exp": 2735689600,
    "iat": 1597676718,
    "auth_time": 1597676718,
    "jti": "XcOpQe2vqTq1kny",
    "grant": "client_credentials",
    "owningLegalEntity": "Example Co.",
    "scopes": [
      "rewards:read",
      "rewards:redeem"
    ],
    "kid": "APIGW-ES256"
}In the policy examples directory, there are 2 different REGO policies:
- jws_examples_v1.rego - which shows three diffent commands to process a JWS
- policy.rego - which shows our final policy
verify_example = { "isValid": isValid} {
    isValid := io.jwt.verify_es256(es256_token, jwks)
}
The io.jwt.verify_xxx function simply checks to see if the signature on the token is valid. It returns a boolean indicating signature validity. It does not check the token claims. The downside of this function is that you must already know the algorithm used and then call the correct validation function.
decode_example = {"header": header, "payload": payload, "signature": signature} {
    [header, payload, signature] := io.jwt.decode(es256_token)
}
The io.jwt.decode() function does not validate the JWS. It base64 decodes the token and returns it's constituent parts (header, payload and signature).
decode_verify_example = { "isValid": isValid, "header": header, "payload": payload } {
     [isValid, header, payload] := io.jwt.decode_verify(es256_token, { "cert": jwks, "iss": "xxx", })
}
The io.jwt.decode_verify() function detects the correct algorithm from the JWS headers, validates the signature and validates the claims in the token. The second parameter for the decode and verify function is an object that contains the validation parameters. The cert property must be a string. A JSON web token keyset must be serialized to a string if you have it already read into memory as a parsed object. The other properties in the object are the expected token values. If an audience claim is specified in the token, then an audience claim must be specified in the parameter list. The audience claim is also assumed to be an array of strings. Audience claim validation checks for the presence of the supplied audience string anywhere in the audience claim array in the JWS.
The REGO policy in this file decodes the token using all 3 functions above and assigns them to the result.
result = {
    "verify_example": verify_example,
    "decode_example": decode_example,
    "decode_verify_example": decode_verify_example
}
The output below shows the result of executing the policy.
{
  "result": [
    {
      "expressions": [
        {
          "value": {
            "decode_example": {
              "header": { "alg": "ES256",  "typ": "JWT" },
              "payload": { "iss": "xxx", "nbf": 1444478400 },
              "signature": "940adccdf37ea482fca1453eecf53cdeefb37d7a2e8170598fa76b15e285b0f128561cbd580ca266546c858aa34d25dd6b0f32c362fea2fb78cd35196f63d632"
            },
            "decode_verify_example": {
              "header": { "alg": "ES256",  "typ": "JWT" },
              "isValid": true,
              "payload": { "iss": "xxx", "nbf": 1444478400 }
            },
            "verify_example": {
              "isValid": true
            }
          },
          "text": "data.jws.examples.v1.result",
          "location": {
            "row": 1,
            "col": 1
          }
        }
      ]
    }
  ]
}
The policy_examples directory contains several scripts and rego policies that demonstrates 5 different ways to invoke our policy. The full suite of JWS signature validations are only performed in the first 4 techniques:
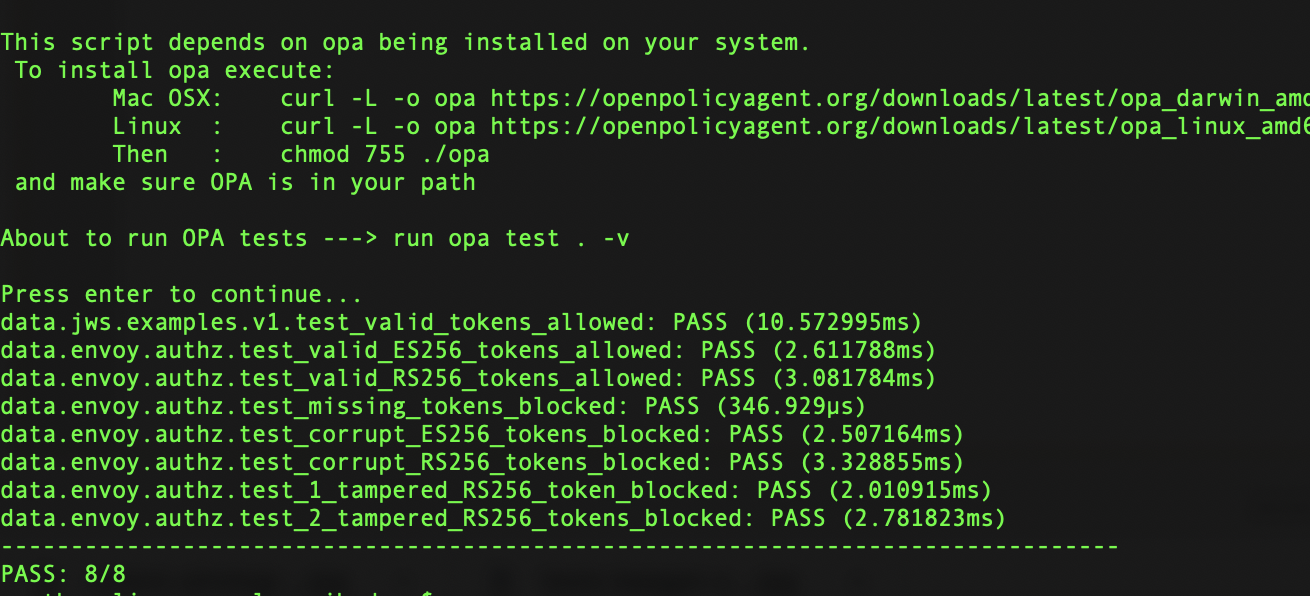
policy_examples/run_rego_tests_locally.sh- This script runs the test policies with a locally installed Open Policy Agent.
As you can see from this example, the output looks much like outpu from test runners in most other languages.policy_examples/run_rego_tests_in_docker.sh- This script runs the test policies using the Open Policy Agent docker container and a locally mapped volume
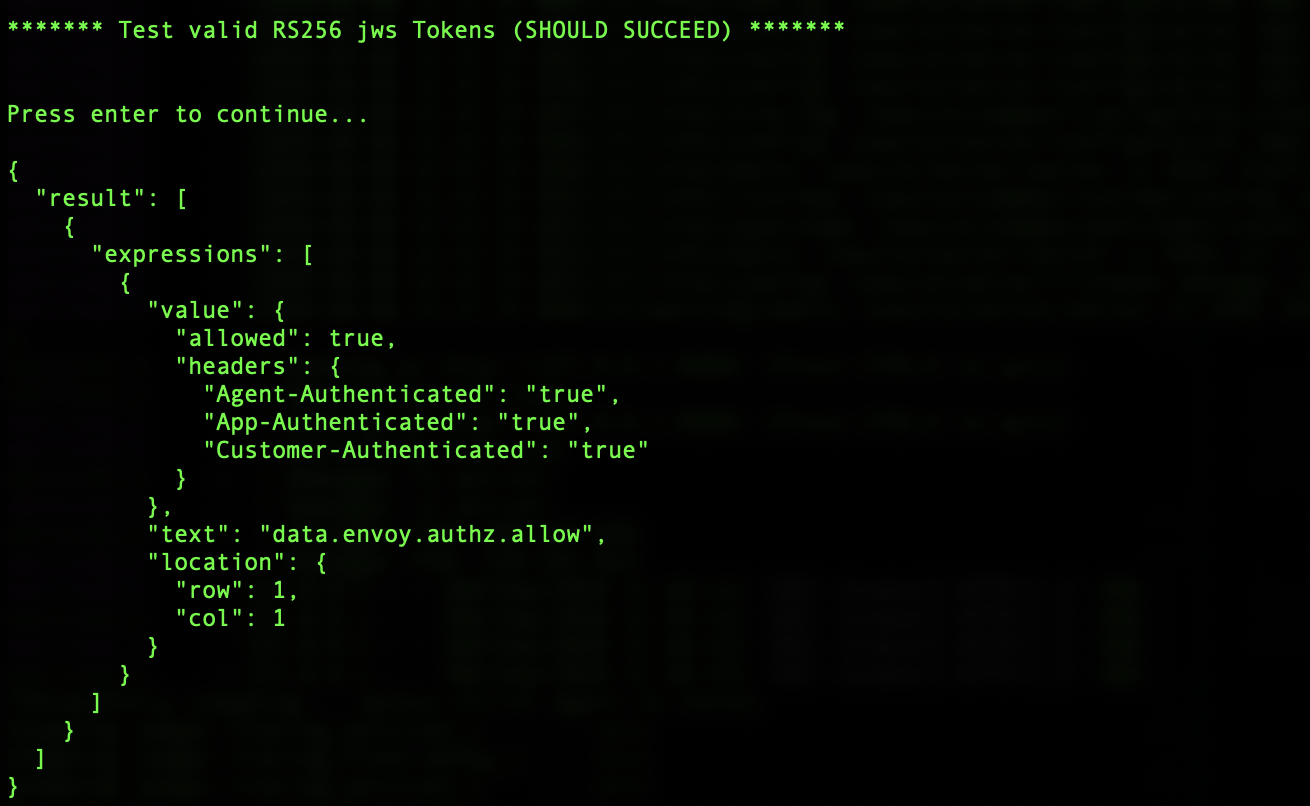
The nice part about using this approach is that it doesn't require anything installed locally other than docker.policy_examples/run_opa_cli.sh- This script usesevalstatements to test policies using the Open Policy Agent docker container. It shows the results of using all 3 JWS functionsio.jwt.verify_es256(),io.jwt.decode()andio.jwt.decode_verify()REGO commands injws_examples_v1.rego. Additionally it shows using eval statements with our finalpolicy.rego. You should see an output similar to this for each request.
As you can see from this example and the REST API example that follows, the output from the eval statement approach and the REST API approach are a bit different. The eval statement technique returns a result object and an array of expression evalution objects. Within each of those objects is a value object that finally contains our results.policy_examples/run_opa_rest_decision_api_tests.sh- uses Curl commands and OPA's REST API running in docker.
The REST API has both a decision ID and the results in a results object. The decision ID can be used to with Open Policy Agent's decision logs to find out more information about how the result was arrived at.demonstrate_opa_jws_validation.sh- This script uses the final solution that shows our fully integrated solution with Envoy. This script uses Curl to make requests to our target service. Envoy asks OPA for an authorization decision prior to forwarding to HTTPBIN.
In the final result you can see the details of the curl request going into Envoy and the decision is implied from being able to see the response from the requested API or a 403 Forbidden response is given.


The difficult part of getting this solution to work is tinkering required to get the Envoy configuration correct and understanding the idiosyncrasies of each of the Open Policy agent JWS functions. The purpose of this article is to shortcut that process for you by giving you a known good starting point with a working configuration and rego policy. Once you have a functioning example, it is easy to adapt the example to whatever your local use cases might be.
In the next getting started guide, we are going to show how you can also validate JWS tokens in Envoy without using OPA at. This gives you a choice to make about where you would like that authorization decision to be made.