Simple implementation to flash PIC16LF1847 using arduino board
Big thanks to tinfever for writing amazing custom BMS for Dyson batteries. Pictures below are taken from his repository. Im not owner nor author of those pictures. tinfever/FU-Dyson-BMS
Target microcontroller (PIC16LF1847) is operaing at 3.3v. Typically arduino is using 5V. That is why you need to utilize some IC to shift the voltages. The clock line is always out from arduino and in into PIC so there you can use voltage divider but data line is bi-directional so there is needed to manipulate it little more. I personally have modified my arduino uno so it is operating at 3.3v. Very good described instruction for that is here
It is recommended to isolate programmer from battery circuit. I did not do any intense research in that manner but for safety i have utilized 220ohm resistors at clock and data lines.
In my battery PIC was locked to only be programmed using high voltage. I assume that it is true for all BMS's. It can be easily manipulated with 8v available from two 18650 batteries included in battery pack. Please bear in mind that VPP voltage have to be in range 8-9V, any voltage above 9.0v may destroy your microcontroller.

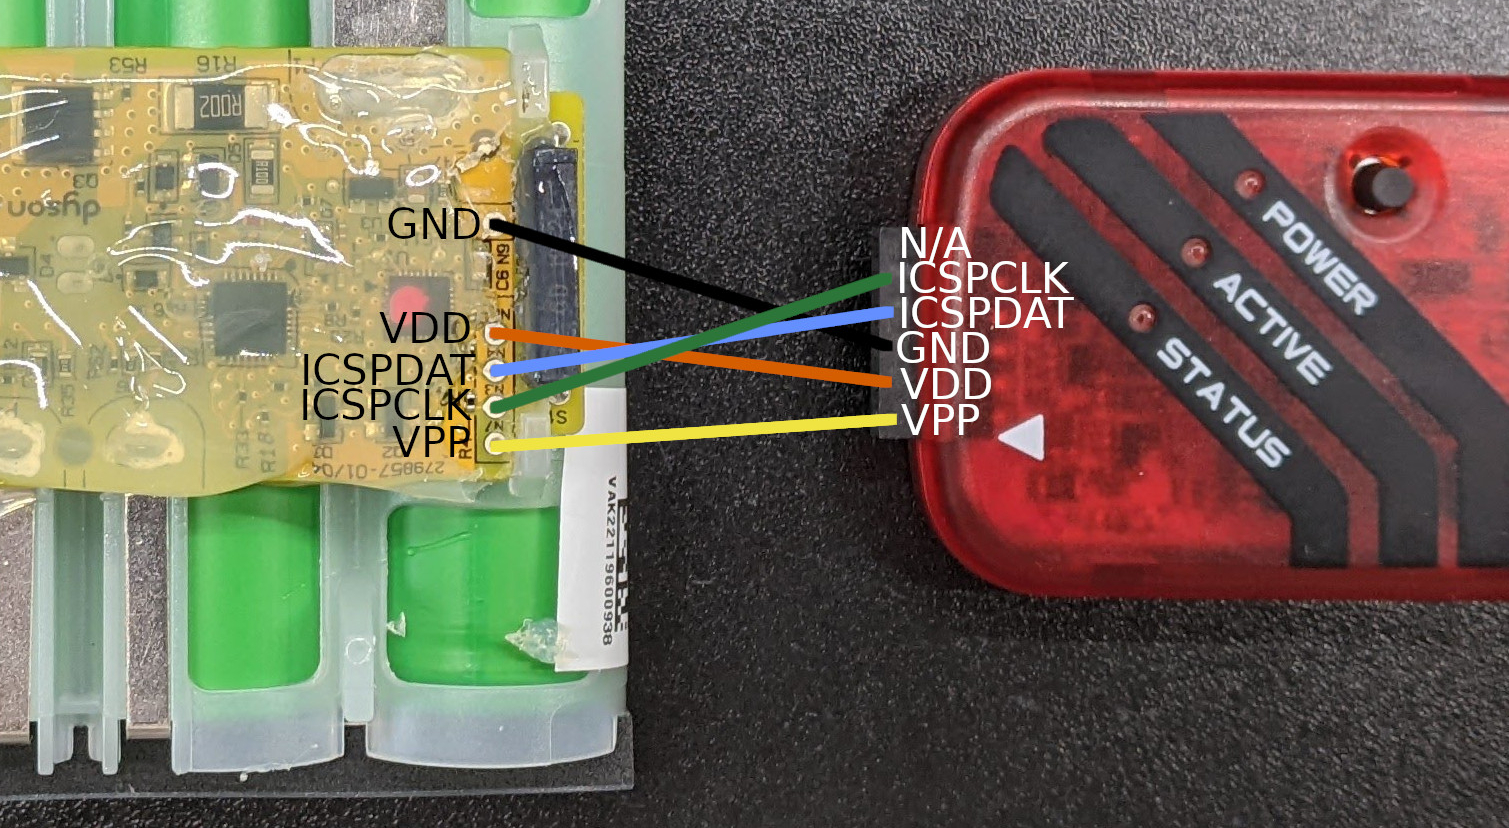
BATTERY <--> ARDUINO
GND <--> any GND pin
VDD <--> not connected
ICSPDAT <--> pin 3 (PD3)
ICSPCLK <--> pin 2 (PD2)
VPP <--> 8v-9v DO NOT CONNECT IT YET! It has to be connected at certain point of time.
- Flash firmware from release into arduino (or open code in arduino ide and program using it).
- Disconnect Arduino from usb.
- Connect Arduino to controller (do not connect VPP yet).
- Connect Arduino to PC.
- Now connect VPP to voltage between 8 and 9 volts.
- Launch programmer using executable file attached to release It is almost sure that your anti-virus will complain or even detect executable as virus. If you do not trust it then start programmer using Java Runtime Environment and .jar file from relase or even just create java project in IntelliJ and launch the code from there
- Load hex file
- Select COM port assigned to your Arduino
- You can test the connection to Arduino and to PIC using two test buttons. Info will appear in the log area.
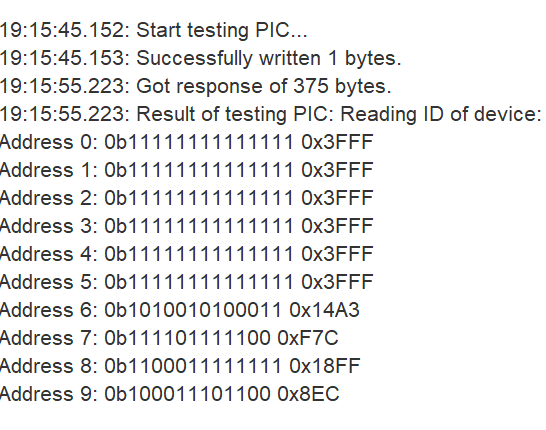
"Test PIC" will read and print values from addresses 0x8000 to 0x8009. Those are UserID from 0 to 3, DeviceID, Configuration Word 1 and 2 and First Calibration word.
If all the values are 0x0 the PIC is probably not powered up.
If all the values are 0x3FFF the PIC probably is not in programming mode - try disconnecting VPP and connecting it again and try test again. - Value in address 6 is device ID and revision which HAVE TO BE correctly readden. Correctness of that can be checked against this document, page 7. If it is not correct then PIC is broken or not original or connections between Arduino and PIC are not solid enough.
- If ID is correct then you can start programming process.
- Can I brick my PIC?
There is always risk of bricking controller, but I have done many stupid mistakes and also messed up the configuration words and always I could re-program PIC and at the very end I have successfully programmed the Unofficial BMS firmware to my dyson battery and it works flawlessly. - Can I unlock my original firmware using that programmer instead of flashing custom firmware?
Yes, it has been tested by probonopd. See here - I have a question, how can I get an answer?
Raise an issue here in github.
As usually and always and everywhere in open source: you are messing with your hardware at your own risk! I will not take any responsibility for damages to your computer, PIC, Arduino or body :D Enjoy! ;)